3.05.2017

Random Sunday Posts: Packing for a shoot tomorrow, Editing video today. And, as always, buying stuff.


Planning stuff in Abilene. 

I've neglected the blog recently because I've been almost overwhelmed by the amount of editing work in house. Seems like every project starts out as "one" three-to-five minute video and, after the fact, turns into three or four separate videos. Like a video Hydra. Chop off one head (get one project done) and three more pop up to take its place. I'm starting to settle in and get my editing chops down but it's all about getting the details right and that's very much a different mindset for me.

Tomorrow morning I have a photography assignment at the theater (ZachTheatre.org) and I've spent some time packing up for it. The choice of camera is very straightforward; I'll take the Sony A7Rii because the images we'll be taking will have multiple uses. Might be used as a large, exterior building wrap graphic, a large, backlit sign and then various direct mail pieces. It's a given that anything we can blow up well to four by six feet (or larger) should be easily repurposed into web applications...

Since this will be a "set up" shot over which we'll have complete control I'm only bringing along two lenses. The 70-200mm f4.0 G lens and the Zeiss 24-70mm f4.0 lens. We're shooting against white seamless paper so anything longer than 24mm is just meaningless and anything longer than 200mm is just wretched overkill. Big graphics mean getting the main subject sharp so fast aperture lenses are also just a burden.

I'll be lighting the white background with two of the Aputure LS-1/2 lights (high CRI LED panels), oriented vertically. This gives me a nice, even wash of light behind my main subject (an actor). My main light will consist of two Aputure LS-1S lights (also high CRI LED panels but with a much more narrow beam angle) shining through a 48 by 48 inch, 1.25 stop diffusion cloth on a Chimera ENG panel. Fill light to consist of a the silver side of a large, collapsible reflector on the opposite side of the main light. Might also use a very small LED panel right above the camera as an "eye" light.

The bane of location work using LED panels is the need for so many light stands. We'll have the background stands, two background light stands, two main light stands, a stand for the diffuser and a stand for the fill reflector. At this point we're already up to seven stands and I may want to add a few stands for flags and other light control modifiers.

I'll also be taking along two long extension cords as well as the detachable cords for each of the lights. There are many...

The sad thing is that the set up will take the better part of an hour. The teardown will take about 45 minutes and the actual shoot may take 15 minutes. It's with a professional actor who knows how to hit a mark and how to turn on his character, on demand. That's about an eight-to-one ratio, time wise.

I will be taking along a Sony A7ii as a back-up camera but it's been years since I've had a camera failure. We're working just by habit at this point.

As I mentioned, I've been spending a lot of time in front of my computer editing video files. Nearly every job comes in these days either as a combination job: photos and videos from the outset; or they come in as one or the other along with a tentative toe-dipping into the other camp. A "by the way, if we set up and shoot this video could you also shoot some high resolution stills after each take?" Or, "We've got six portraits to shoot and were wondering how hard it would be to bring along the gear to be able to shoot a quick interview of the CEO. He'll be the last person of the six you'll be shooting..."

The days of just shooting one or the other as discrete jobs, separated by time and intention, seems to be waning quickly.

So, as I've been editing I've been asking friends with long tenure in the film industry to spot check my work and advise me to make sure I don't make too many career ending mistakes. This pushes me to really up my game and try to be as picky and detail oriented as I can be in order not to look like a moron to my close friends. It seems like as good a motivated learning strategy as any other....

Luck has been with me so far. I haven't had any production catastrophes; no out of focus A camera footage, no unmanageable noise in the tracks. But I'm getting more and more sensitive to the sound profiles of specific microphones and their "noise floors."  It's that part of the new learning curve wherein one finally realizes that there is a certain logic in getting the best one can afford going into the real production phase. Dollars on the table and that sort of thing.

I feel as though I have several aspects of videography down well enough. The lighting is no mystery and my years of research and use of LED lights works to my advantage here. In much the same way my understanding of the visual parts of the projects is also fairly well fleshed out. Moving the cameras in a transparent way is always a challenge but I think it's a lifelong learning practice in most regards. No, the wild card is the audio. Every room has a sound, every building's electrical grid adds something to the mix and every microphone has a sweet spot.

I've been buying several audio components and, for the first time in a while, returning a number of them that I find to be unsatisfactory. I recently bought a Tascam DR-70 with the idea of using it in field production as a pre-amp and mixer, sending the final signal directly into the camera for recording. The microphones hooked to the unit sounded good and the unit has very little noise until I connected the "camera out" port to my camera. Listening to headphones from the camera shocked me. Here's recently launched unit with a camera port that doesn't do proper signal matching. The hiss coming into the camera was overwhelming at any level. A quick check on the web reveals that this is a "known issue" and can be fixed with a special cable. No thanks. Don't need to be dependent on special cables dedicated for one particular use. Back in the box. Back to the store.

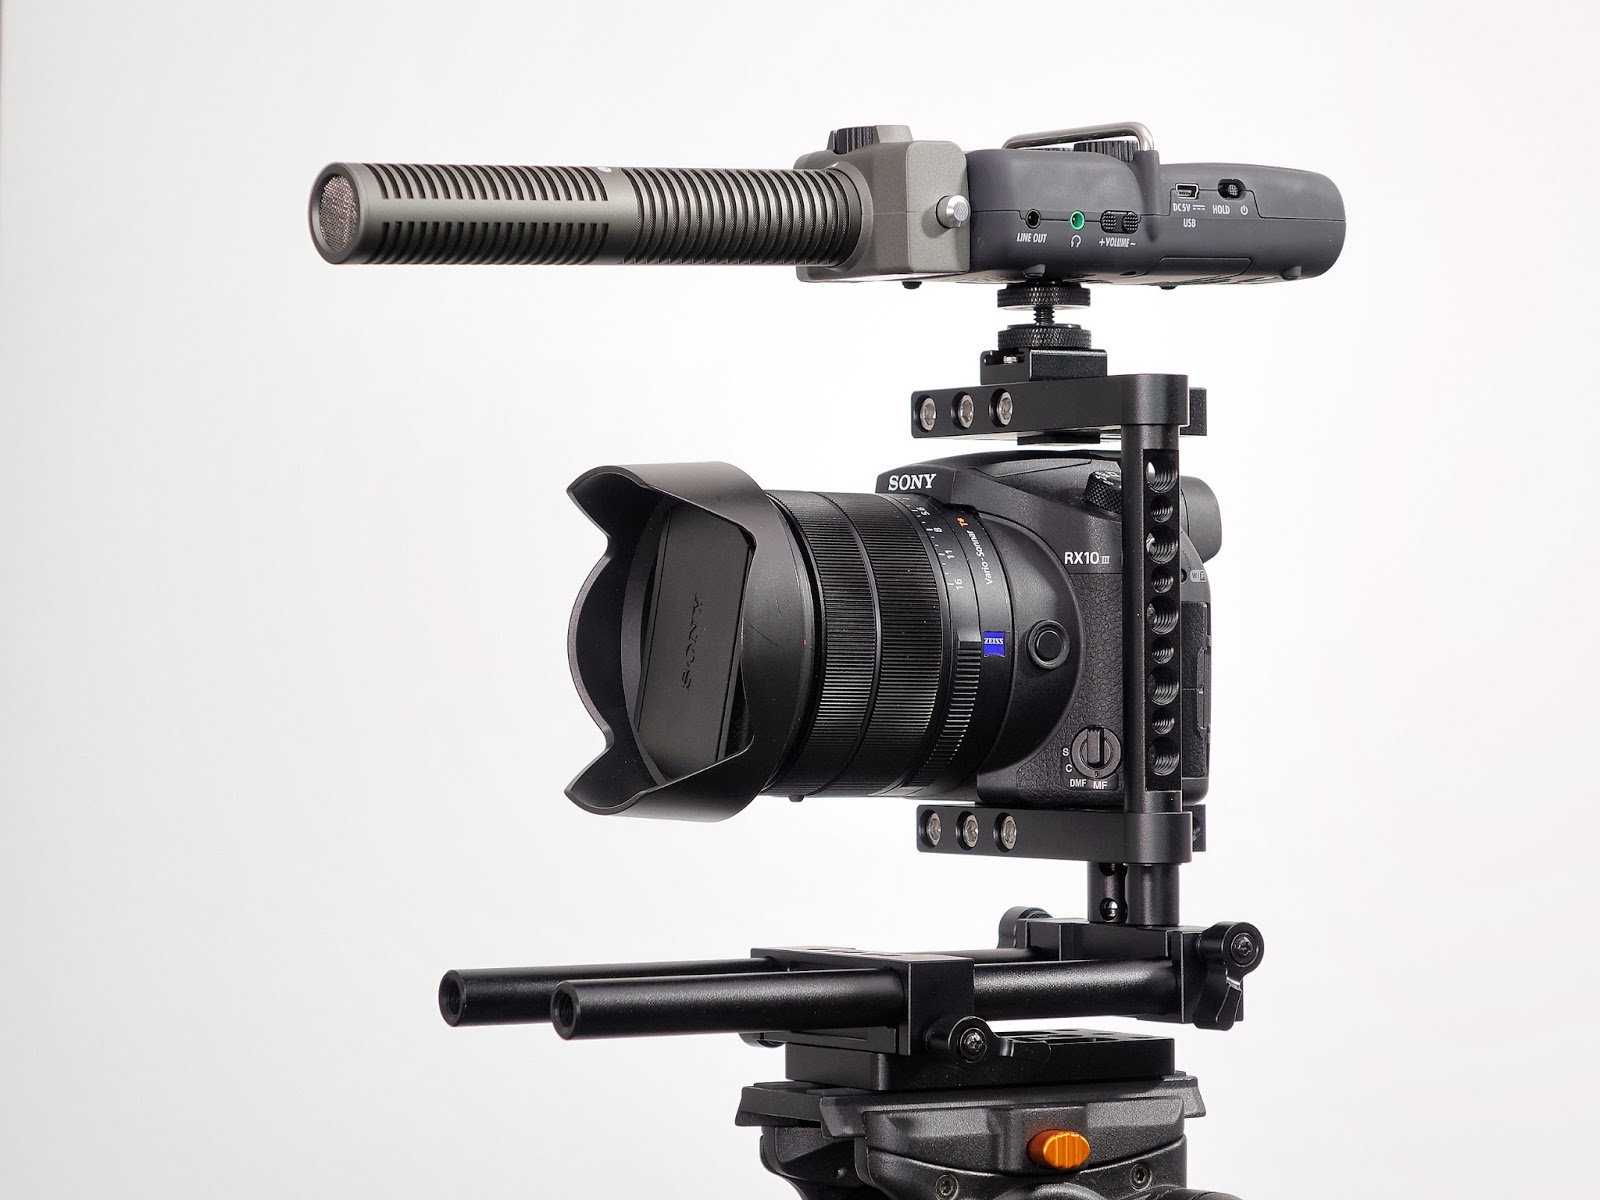
A bit later I was searching for something on Amazon.com and came across a simple device from Saramonic called a SmartRig+. It's a small pre-amplifier which also provides 48V power to microphones that require phantom power. It comes with a dedicated cord and a switch. You can plug the cord into your camera or your smartphone. Voila! A simple solution to putting professional microphone feeds into your Sony RX10iii camera. I bought one. It came. I listened to it and found it to be astoundingly quiet and clean; especially when considering the price tag of less than $100. I should by a couple. It runs for about 12 hours on one 9V battery and fastens to the side of the camera cage. The device even has its own headphone jack for camera that don't offer such (Panasonic FZ1000, Sony a6300). You'll want to use the camera headphone jack to make sure the signal actually got to the right spot.

At this point I want to tell you about a great resource I found on the web. It's the site of an audio guy named, Curtiss Judd. Just as photographers have a manic focus on reviewing and pixel peeping various cameras, Mr. Judd is afflicted with the same addiction when it comes to audio gear. He's constantly testing microphones, mixers, recorders, sound blankets, and anything else in the signal path. He's also very clear about his testing methods and provides actual recordings in each episode in order to prove his points and nail down his credibility. His videos are very well done and; unlike most of the rest of the web, the audio never sucks (unless he is intentionally making a point or comparison).  I found validation about my purchase of the little Saramonic on his site and I've stayed and read many other articles that have proved sticky in my brain.

One of the things he did a segment on was a new microphone from one of my favorite video oriented companies, Aputure. Apparently they've more or less copied (and improved upon) the classic (and much loved) Sennheiser MKH 416 hyper-cardioid microphone. The Sennheiser is about $1200 and has been on the market for well over a decade. It owes its longevity to the fact that it is very, very good and has earned a reputation among sound people as the microphone to demand in the sound package for many movies and cinematic style projects.

The new Aputure microphone is called, "The Diety" and promises a similar sound profile, a bit more efficiency and ..... serious weatherproofing. Curtiss Judd's review suggested that the new microphone was a worthy competitor to the legendary Sennheiser mic, but at about 1/3rd the price. I have purchased one and will start testing it after a shoot we have booked on Tues. I'm hoping for clean vocals and a very low noise floor. The microphone is strictly phantom powered but now I have three options that provide phantom power and very low noise pre-amps as well.

On my next project I may just break down and record sound to both an external recorder as well as the camera and test from there. I must say that the pre-amplifiers in both the Tascam DR60ii and the Zoom H5 are very clean and uncolored. I'm also auditioning sound people with the idea of putting together a core crew for future work. I'm hoping to enlist a second camera operator who can also run first camera if I want to fully dedicate myself to interviewing. The second position is the sound "guy." I need someone who understands microphone placement and can work with my idiosyncrasies in areas like sending an audio signal to the recording camera.

One interesting facet of each video project is the necessary purchase of two four Terabyte hard drives at the outset of each assignment. One to work from in post and one as a secondary back-up to our main drive back-ups. At the end of the assignment; once the edits have been approved and delivered, the both get labelled and go into the filing cabinet, in a job jacket for that client. Adds about $160 to each job but helps ensure good sleep.

At this juncture I am waiting patiently for the Sony RX10iv and the Sony A7iii. I have a little piggy bank sitting on the edge of the desk just waiting to be smacked with a hammer.

Happy clients. Happy creative person. Two more edits to go on the Canada project. I'm actually having fun editing --- who would have thought?

Ben is doing well in Korea. He's been everywhere already, including a visit to the DMZ. He started classes last week. No foisting the edits off on him until the middle of the Summer. Drat.


3.03.2017

One of the four videos we're producing for a healthcare client.


I came back from Canada last month with hours of good video material that we're weaving into various programs. One of the first priorities was a short video message from the Canadian CEO about the 20th anniversary, in Canada, of one of their prosthetic leg products, the C-Leg.

More videos to come.

3.02.2017

I finally had time to do a better edit on this interview with Dave Jarrott. I like it now.


Dave Jarrott Interview Solo from Kirk Tuck on Vimeo.

Location Portrait Shooting in 201X. Leverage what's there.

©2015 Kirk Tuck. All rights reserved.

©2015 Kirk Tuck. All rights reserved.

Recently,  I was asked by an Austin-based tech firm to make a series of portraits of a collection of their people. We're consistently moving away from using manufactured backgrounds for nearly all of our "out of the studio" locations and so my first task was to go to the client's location and scout for good, existing, environmental backgrounds. I was looking for clean spaces that would look good and contemporary. I wanted to find spaces where the backgrounds could be far enough away to achieve limited depth of field; even with smaller format cameras.

The building the company occupies is one of the prime, downtown office towers and the office plan calls for floor to ceiling windows on three quarters of the perimeter. So you have a windows on one side of a continuing hallway and offices on the other. The effect is one of open and airy space. Even the conference room, in which I ended up shooting the top portrait, faces out onto a western part of downtown through an exterior wall that is also a huge window. 

When I shot these images I was still working with the Panasonic GH4 cameras. I used the little 42.5mm lens and my amazing Olympus 60mm f1.5 Pen lens for all of the photographs done for this project and I have to say that I was happy with both the tonality of the lenses and the whole system's ability to render a nicely out of focus background rendition; not too much but not too little...

I used a 50 inch white. 1.25 stop diffuser between the subject and the windows. I did this to drop the level of light on the subject so I could control the overall color and quality of light that fell directly on him. In each image I added to the light on the subject with a bit of flash, bounced into a 60 inch umbrella, to control his contrast and exposure. I felt that by using just natural light there would be a bit too much contrast in the images and I'd rather get the parameters right while shooting than having to labor over stuff in post production. 

The flash also neutralized the greenish-blue cast caused by the tinted office windows. You can see the color cast in the background areas but not on the subject. 

I tried my best to use a light touch on the flash but to still exercise the control needed to get what I wanted aesthetically from each shot. While the photos look casual they were both executed using a tripod to help me hold the exact composition I wanted through the whole series of exposures. 

We've been using styles similar to this for most of our portrait clients over the last three years and have been getting good feedback and repeat engagements. It's a nice style and one that also "cuts" well into video projects. Certainly much better than an executive in front of a blue paper background with a spot circle in the middle of it....

Styles and aesthetics change. We change with them. That doesn't mean there isn't a place for the traditional studio but; oh wait; maybe this is an argument against the traditional studio....


3.01.2017

Game Over?

http://www.styleshoots.com/live

Go to this link and tell me what you think. "An endless stream of content..."

Sounds about right.

2.28.2017

To Paraphrase Donald Trump, "Who knew that video editing would be so complex and time consuming?"

Photo courtesy: ODL-Design ©2017

A few observations about video: Shooting is less than half of the game, editing is where you tell the story. But if you didn't shoot it right in the first place it's very hard to tell the story right. 

I'm kind of a "big picture" guy. I like the big outlines, and because of that I'm more drawn toward the collegial meetings and the hands-on shooting than I am spending days and days in self-imposed solitary confinement; sitting in front of a computer, staring at tons and tons of options; many of which could work just fine in a final video. If you put them together correctly. 

I sent over a rough edit of my Canada shoot to my client about a week ago. I'd worked hard to incorporate everything we talked about in the program I sent along. But even after I sent it I still sat in front of the computer with the video timeline stretched all the way out across my monitor. I was looking at the little telltale peaks and valleys in the audio track. I was trying to track down the spot where one of my interviewees made a "tsk" sound just before they spoke. I could fix that. And then I look for the subtle scrape of someone else's wristwatch across the top of a desk as they shifted and got ready to initiate their response to a cogent question. It seems like no matter how many times you sit down and open up a project there is always some way; no matter how small, to improve it. 

Today was "detail day." I used a program called, Motion, to build moving titles and I spent time kerning type and worrying about line spacing. I spent a lot more time nudging the color so it would be exactly the way I wanted it. I think I tried every transition technique in Final Cut Pro X to get to the one I finally settled on for one pesky edit. 

What I realize now is that you have to approach every editing project with a plan. You have to know how you want to start out and how you want

2.27.2017

Shooting with a new, short zoom. The Sony 28-70mm f3.5 - 4.0. Nice.


You know that feeling that you get when a new (to you) lens gets dropped in your hands? You know it's probably just another reasonably good, modern lens but you just have to put it on a camera and try it out for yourself. Secretly you are always hoping that this one will have that little bit of extra magic that just makes your photographs sing. On key. That's the way I felt when my friend sold me his relatively new (and hardly used) Sony FE 28-70mm lens. I knew it wasn't going to blow away the stuff I already own but I was hoping it had some endearing quality which would become known to me as I shot with it. 

It was gloomy and overcast yesterday afternoon. The threat of rain hung over us like a boring dinner guest reaching for that last slug of great red wine at the bottom of the bottle. I had just finished reading Ian Rankin's gloriously good new novel, Rather Be The Devil, and I was ready to get out of reading chair and get outside. I put on a jacket, grabbed the A7ii and headed away from my sleepy, cloistered neighborhood toward the promise of a hipster downtown. 

Since it was cloudy and flat I set the white balance control to the "cloudy" icon, selected auto ISO and set the lens for f5.6 in aperture mode. All done and ready to shoot randomly and happily. 

I walked from Treaty Oak over to the Graffiti Wall to see what new art had appeared since my last visit many weeks ago. The place was hopping. I brought the camera up to my eye and one of the first things I noticed was how nice and stable the image stabilization seemed. As I understand it the camera system uses both the lens stabilization and the body stabilization in tandem. That gives you full five axis performance. 

There are no external switches on the lens. It's extremely spare. I thought the images had a nice bite to them. 

There is something nice about having a small, lightweight package that wasn't priced to break the bank on the front of my beater camera. I was still careful to keep it from getting drenched in a sudden downpour. That's why I keep a one galloon ZipLoc bag in my jacket pocket on days like today. I got wet but my camera stayed dry. 

All in all I am a fan of the lens. It's pretty nice. 


When will we see a refresh of the Sony A7xx series? Here's what I think we'll see in the next revisions.


Every working photographer has his or her own favorite camera system and most of them are pretty loyal. Once you find a brand you are comfortable with it takes a lot for most people to abandon the known and comfortable for the supposedly greener grass next door. I bounced around from system to system until I landed squarely in the Sony camp and I couldn't be happier. So happy that I've been able to give my credit cards and bank account a vacation for the last full year. And most of that warm, fuzzy feeling about the Sony system is due to the big lifeguard in the Sony pool, the A7Rii.

The "big" Sony flagship combines very high resolution (cherished by some clients) with near industry leading dynamic range (making photographers and videographers smile) to make it a great still camera for a large swath of users. While I would not recommend it as a sports camera or a fast action camera those of us who make portraits, shoot products, produce lifestyle shoots, make landscapes, photograph food, etc. have embraced it for its exemplary image quality.

On the video side the ability to shoot high quality full frame, and even higher quality APS-C cropped 4K video, and to write that 100 mbs video directly onto the camera's SD card makes it the top of the current full frame cameras, mirror-free or DSLR, for shooting video. In fact, it's only real competitor in the full frame (35mm) range of cameras, for shooting video, comes from its own sibling, the Sony A7Sii.

Just knowing I've got this camera in the case makes me confident that I can photograph pretty much whatever a client throws at me and that I'll be satisfied with the results.

In the Sony camera line there is another full frame camera

Picking up a bargain lens. A used, Sony FE 28-70mm, f3.5 to f5.6. The full frame "kit" lens.

Sony FE 28-70mm OSS lens. Sitting on the front of my A7ii "beater." 

"I'm upgrading to some Zeiss stuff. Do have any use for a Sony kit lens? The 28-70mm FE?" That's how the conversation started. I hemmed and hawed since I already own the Zeiss 24-70mm f4.0. But then my friend tossed out a price that was less than half of the "new" price for the lens and I couldn't resist. After all, one can always use a good "back up" lens and the many reviews out on the web are mixed as to which lens makes better photographs. 

My friend is mostly a Leica user. He shoots with an S2, and just recently picked up an SL and a 50mm f1.4 Aspherical, but he'd decided to put a toe into the Sony waters, just to see what all the fuss was about, and just couldn't bring himself to use a "kit" lens. 

Next time I see him I'll thank him again. The lens is really very good and the combined image stabilization of the camera and lens is also a nice touch. 

I rushed into my initial lens selections when I plunged into the Sony system -- well over a year ago. I started off with the 70-200mm f4.0 G lens (which I think is spectacular) and the 24-70mm f4.0 Zeiss lens (with which I have been perfectly happy). Had I done a bit of research and tried both the kit lens and the Zeiss lens, side by side, over a long weekend I just might have returned the more expensive one and kept the cheaper one. But knowing my own butt covering propensity had I bought the 28-70mm I would start to think about the truncated wide angle capabilities of the kit lens and almost immediately started looking at wide angle zooms to supplement. In the end I would have spent much more money on a kit+16-35mm than I would have just sticking with the 24-70mm. And I know myself well, when it comes to lenses; I never shoot much at all that's wider than 24mm. I just don't "see" wide. The times I've splurged for something like the Nikon 17-35mm lens I ended up blowing the dust off of it a bit later and selling it at a loss. Just never use them. 

I do have a 14mm Rokinon sitting in a drawer ---- just in case wide is required. Rarely use that one either. 

Circling back to the 28-70mm. It's a nice lens. It's very sharp in the center and adequate on the sides and corners. In the old days I might have wished it had a faster aperture but I'm happy to apply more ISO if required and I'm more and more starting to savor a little more depth of field and sharpness in my photographs. A little context is kinda nice.  It feels nice and focuses quickly on the most recent A7xx bodies. It comes with a flower petal lens shade. Please don't put it on your lens backwards. Use your shade in its correct orientation or forever brand yourself a photographic moron...

The bottom line is: the kit lens is a nice companion for the A7ii body. Both are small and light and I can walk for hours or days without noticing the (light) weight. For the price I just didn't think I could go wrong. Ah, the power of rationalization...

Sony FE 28-70mm OSS lens. Sitting on the front of my A7ii "beater."

For smaller cameras pressed into producing video the Cage is all the Rage. Here's a great, cheap one.


Sony RX10-3 show in a Camvate Cage Rig. Providing vital mounting points for all the crap you need to make small camera video production workable. Photo:  ©2017 Kirk Tuck, courtesy: The Visual Science Lab.

What is a "cage" and why might I need one? Still cameras don't need cages...unless you are laboring under the idea that your still camera is also a potent video production camera which you can use to create video art and also to produce video programs for which you get paid. Then... you might start considering a camera cage. Basically, a cage provides a metal "exo-skeleton" for your camera which protects it from some knocks and scratches but mostly (and most importantly) provides mounting points for all the junk that you are going to want to buy and hang off your camera in order to make nice video. 

The cage I'm looking at in this blog post also provides a basic rail system that, in addition to a bare bones cage, also gives you mounting points for follow focus attachments and a compendium shade or matte box. The distilled down cage is an assemblage of metal parts that fit around your camera and provide 1/4 inch and 3/8ths inch threaded mounting points. You use these to attach: external audio recorders, external microphones (though you are better off getting the microphone off the camera and closer to your subject...). monitors, pre-amplifiers and mixers. Or some combination thereof. 

If you take a Sony RX10iii as an example there are only two mounting points on the camera itself. One is the tripod mount on the bottom of the camera and the second is the hot shoe on top of the camera. But the hot shoe is right above the EVF and anything that sticks out over the EVF is going to get in your way, if you use the EVF to focus and compose. The hot shoe might also put the piece of external equipment that you need to use in just the wrong position to be helpful... The cage provides a better solution. (more below). >

Photo:  ©2017 Kirk Tuck, courtesy: The Visual Science Lab.

I recently bought SmallRig (brand) cages for both the Sony A7Rii and the a6300. Both of those cages were custom designed for those specific cameras and they fit snugly around the cameras giving you a very discreet visual profile. Adding a cage to the a6300 transformed that camera from a pain-in-the-ass (handling) camera, with great image quality and super video, into a much more ergonomic shooting package. The naked a6300 is too small to hold well and, if mounted on a tripod the only place to put stuff is in the hot shoe. Seems dicey to me to add much weight to such a small connection point, especially since there is so little "real estate" on top of that camera to play with. The SmallRig cage allowed me to put a Beachtek audio interface on one side while attaching  a monitor to the top area of the camera. The monitor allows a much better viewing experience than the smaller screen or poorly light shielded EVF while also giving us a headphone jack with which to monitor our audio. Even with both of those devices connected there is still at least one more available mounting point which I could use to attach a stereo microphone for ambiance. 

The A7Rii is a much bigger camera (it's all relative) so the cage for it is more spacious and gives me lots of room to make attachments. In addition to a digital audio recorder and external monitor is seems to me to be a good idea to also attach a big, lithium ion phone charger battery which could power the camera through the USB port for many hours. 

After many good experiences using cages on both of the above cameras I knew I wanted to find a good one for the RX10iii but I couldn't find one made specifically for that model. Bummer. I was going to order a generic model meant for a wide range of medium-sized cameras when I came across this one (see all photos) from a different company. The products looked similar to the ones from SmallRig but offered the rail system, in addition to the basic cage, for a price of around $120. I read the reviews on Amazon.com and ordered one, knowing that if it wasn't up to my standards I could easily return it. 

(more below). >

 Photo:  ©2017 Kirk Tuck, courtesy: The Visual Science Lab.

The product camera yesterday and I couldn't be happier with the flexibility and quality of the system. It came well packaged and the maker provided some extras that were most appreciated. The system is meant to be adapted to many different consumer camera models so it stands to reason that one can do a fair bit of customization. 

For instance, there is a bar that attaches the top plate to the plate on which the camera sits. You can adjust the bar at either end to fine tune the height of the top plate to the top of the camera. Some people might want a snug fit while others might want more space in which to get their fingers on the camera to operate controls. If the bar is too short, fear not! the package comes with a second bar that is about .75 inches taller.  I ended up using the shorter bar with the RX10iii (which is not a very small camera) but I would need to use the longer bar if I were to use the rig with something like a Nikon D5 or a Fuji XT(xx) with a battery grip. Nice to have it included in the package. ..

(more below). >
Photo:  ©2017 Kirk Tuck, courtesy: The Visual Science Lab.

While the "fly-by-wire" focusing system of the RX10iii doesn't lend itself to the use of a follow focus the rail system is great to have anyway. It creates several more attachment points for things like bellows shades and matte boxes which can help with some tricky film making. It can be used to balance the weight distribution on a tripod.  It also looks pretty cool...

(yes, more below). >
Photo:  ©2017 Kirk Tuck, courtesy: The Visual Science Lab.

I am happy with the products from both companies and I'm happy to leave the cages on the cameras. In this way I can outfit the cages with the gear I need for specific  video shoots before I leave the studio and then dump them into a Manfrotto video bag for safe keeping. Once I get to my location I can put my rig up on a tripod, connect the cables, and be ready to shoot. Even the best rigs won't be as fast and carefree to use as a dedicated video camera but even in that arena (ENG) I see many operators festoon FS-7 and FS-5 cameras with so much junk that you'd be hard pressed to use the cameras quickly, or even handheld. 

Photo:  ©2017 Kirk Tuck, courtesy: The Visual Science Lab.

Photo:  ©2017 Kirk Tuck, courtesy: The Visual Science Lab.

On every shoot I've ever done I learn something new. I learn some way to do something better or more efficiently. What I learned on recent assignments, which skewed heavily to video, is that having the audio recorder or other tool in the right place in order to reach the controls easily (and without adding unwanted vibration to the overall rig) is critical, and that a good cage, with lots of attachment points, can make a big difference in your overall effectiveness as a camera operator.  A bit of customization can go a long way. Now to see how the rig works on a shoulder mount for an upcoming documentary. More learning to come. I just hope it's not too painful...